WHAT IS A SLOPER?
A sloper is the basic starting point for pattern design. Also known as a fitting shell, it is a baseline with enough wearing ease to allow for movement and breathing, but no design ease and no details. (It isn’t quite the same as a moulage, which fits even tighter, like a second skin, and it isn’t the same thing as a block, which is a basic pattern for a specified style, with design ease included, that can then be elaborated with details.) Slopers don’t include seam allowances.
WHAT IS A SLOPER USED FOR?
Patterns almost never fit right out of the envelope. This isn’t a failure of the pattern. All patterns (except bespoke ones) are drafted to an average set of measurements that falls somewhere in the middle of the vast spectrum of human shapes and sizes and body types. Unless your body dimensions happen to be very close to that average set of measurements used in drafting, your pattern will need adjusting to better fit your body. A sloper or fitting shell can help you to work out and keep a physical record of those adjustments.
A sloper is like a two dimensional dress form. You can use a sloper as a basis for designing your own patterns, or you can use it as a fitting aid to adjust patterns to your body measurements and preferred fit. In adapting a sloper to your own measurements, you establish a known minimum requirement for garments to fit, and you can establish the fit adjustments that you know you need to apply to every garment, instead of figuring them out anew for each pattern. The sloper provides a baseline for fit, where the pattern uses additional design ease, design lines, and detailing to give style, structure and movement to garments.
CHOOSING A SLOPER

Choose the sloper that best fits your high bust measurement, which is different that the full bust. (More about my pattern size naming conventions here.) The full bust measurement varies greatly with cup size and tissue distribution and isn’t necessarily indicative of the best overall fit for your body. The high bust measure is taken higher, above the fullness of breast tissue. The idea is to find the pattern that best accommodates the bone structure of the chest, which tends to better fit the neck and shoulders that the garment hangs from. Areas like the waistline and hipline, while still important for fit, can be adjusted with less difficulty than the upper body where the fit and angles of the neck, shoulders, and chest all affect one other.
ADAPTING A SLOPER TO YOUR MEASUREMENTS

(click here to open the full size image)
Once you’ve selected your sloper, print and assemble it or lay out the copy you want to cut up and modify. Begin by locating several points that will serve as landmarks for comparing to your actual body measurements like the high point shoulder, bust point, waist line, high hip (approximately halfway between the waist and low hip), low hip (around the fullest part of the hips).
Most companies provide the finished measurements of the garment, which may tell you the final circumference of the bust, waist, and full hip when the sloper is sewn together. (The approximate finished measurements of my slopers are available as a pdf file here or a .jpg here.) These measurements will be larger than the body measurements it was drafted for because of the wearing ease. It can be helpful to measure the sloper to get a general idea of a few additional things like the vertical positioning of the bust line, the waist line, and the hip line as well. These measurements are a good place to start in comparing the sloper to your body dimensions. (You can download a worksheet to record sloper measurements and your body dimensions here, as a pdf or a jpg.)
Then take body measurements. Establish the waistline as a point of reference by tying a piece of elastic around the waist and bending several times to allow it to settle into the bend of the waist. It can be helpful to mark points on the body with something like eyeliner pencil in order to have them remain in place, especially things like the line where the side seam would be, so that it’s possible to get an accurate measurement of front waist versus back waist or front full bust versus cross back. Taking only a circumference measurement can obscure certain fit issues like a broad back or a full abdomen that require adjustments to be made to only one half of the pattern.
COMPARING THE SLOPER TO THE BODY
To begin assessing where adjustments to the sloper are needed, compare vertical positioning of the waistline by measuring your front waist length and back waist length against those of the sloper. If these are too high or too low, make a horizontal cut in the pattern midway between the bust line and waistline and overlap or spread the pieces as needed. (This change will need to be done to both the front and the back of the pattern in order for the pieces to match up correctly.) One way to do this is to place the sloper over a large sheet of paper, spreading or overlapping as needed, and then redraw the center front and side seams, making sure the side seam lengths match on front and back.
TO SLASH AND SPREAD A PATTERN TO ADJUST:

HOW TO OVERLAP A PATTERN TO ADJUST:

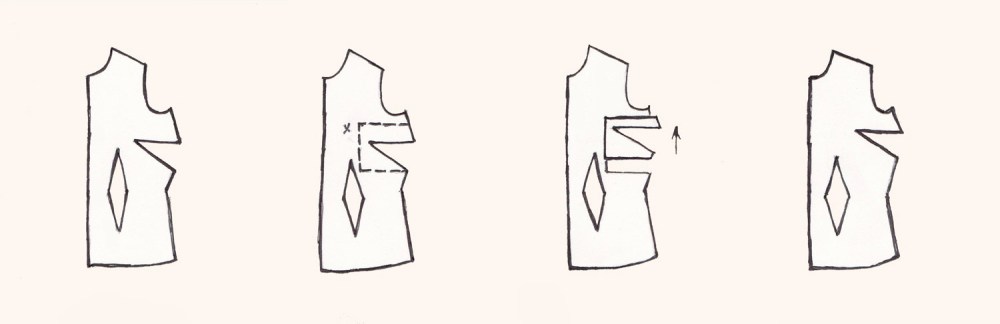
Then check the position of the bust point, which is the fullest part of the breast, usually at the nipple. On the sloper, the darts should point toward the apex, or ideally, extend to the apex point. If this positioning is incorrect, the dart can be raised or lowered by cutting the pattern, sliding the segment with the dart on it up or down as needed, and redrawing the side seam and checking to be sure the length still matches the side seam of the back piece.
Then check horizontal measurements. Most horizontal measurement adjustments can be made by slashing and spreading the pattern apart and reducing or increasing waist darts to add or remove inches as needed. One of the easiest ways to add or remove inches horizontally is if you have a nested pattern. You can blend sizes as needed. For example, if your hips are two sizes larger than your waist, you can simply redraw the side seam to gradually shift into the line of the pattern piece that is two sizes larger for both the front and the back pattern piece.)
It is important to remember that changes made to the quarter body pattern piece will be made on the other side of the body in the garment as well, so adding one inch to the waistline of a pattern piece will mean that two inches total are being added in the full garment. It’s also important to remember that the side seams and shoulder seams of the front and the back pattern need to match up, so certain adjustments that change these seams will have to be modified on both pieces.
On the bodice slopers I’ve drafted, the high bust measurement will most likely not require adjustment since the pattern size is based on this measure, except in cases of a very broad back or shallow chest, etc. The full bust measurement should only require adjustment for cup sizes smaller than B or larger than D, in which case, there is a great explanation of bust adjustment and precisely how much to slash and spread a pattern for your size (here). The measures of the cross back and the high hip taken only in the front can be helpful for figuring out if a broad back or fuller abdomen might need adjustment. The worksheet can help analyze and compare exactly which points of the sloper need to be adjusted in order to bring it in line with your body measurements.
TESTING YOUR SLOPER
Once your adjustments have been made on paper, the next step is to test them by sewing a muslin. The way I like to do this is to begin by tracing my sewing lines onto the fabric, or better yet, onto Swedish tracing paper. (This is a relatively cheap, very sturdy “paper” which feels almost like the material of a fabric softener dryer sheet. It’s easy to write on and trace through, and it doesn’t rip or get nearly as wrinkled as pattern paper. It behaves like a fabric and you can sew it just like muslin. It’s my favorite way to test patterns. Amazon has it here.)
When you cut the pattern, remember that the marked lines are the sewing lines. You can draw in seam allowances at whatever width you prefer. You can also cut the pieces out with very large seam allowances of an inch or more so that you have some excess material to work with if you want to let out seams during fitting.
I don’t sew the sloper at all initially. I do a “pin fitting” of the front and back bodice pieces, omitting the sleeves initially, using pins to close the darts and all the seams. Since the Swedish tracing paper is easy to see through, I can pin precisely on the sewing lines, and then try on the garment, pinning the center front closed on the sewing line and clipping the neckline down to the sewing line.
With the sloper on the body, you can carefully analyze whether the garment is too tight or too loose, and see the way the garment hangs from the neck and shoulders. I find it best to begin with the neck shoulders and work downward making my adjustments, since the shoulders are the crucial point at which the garment hangs, and one change affects the fit of so many other areas. It’s important to scrutinize and note if the neckline fits comfortably or if it gapes, and if it is too deep or too shallow. For the shoulders, is the seam in the right position, ending at the appropriate point on the shoulder? Is the slope correct? Does the fabric drag or pull here? This is where being able to unpin and experiment with the fabric to correct issues is very helpful.
The armhole of the sloper should be relatively close fitting. Is the armscye position appropriate? Does it feel too tight or too loose? This can be hard to judge precisely without the sleeve set in, but if it is obviously too tight in the underarm or hangs too far below it, these issues will need to be adjusted, usually by taking in or letting out at the side seam.
You can work your way down the body, noting drag lines or places where the fabric seems to pull or be too loose. Does the center front gape or sag? Are the side seams straight up and down, or are they being pulled toward the front or back? Is the bust position correct? Does it skim the body without being too tight or too baggy here? Do the darts point toward the bust apex? If not, mark its placement so that you can make dart position adjustments as needed. Does fabric seem to wrinkle or pool anywhere, such as the small of the back?
It’s easy to overanalyze and overmodify during this process, so it’s important to keep in mind that the goal isn’t necessarily perfection here, but a workable fit that allows you to move and feel comfortable and fits your body smoothly without any bulging or pulling.
After any obvious fit issues have been addressed in the bodice, then I sew the seams and set in the sleeves to see how well I can move in it. Sleeves can be tricky, but many sleeve fit issues actually arise from problems with the bodice, such as armhole depth and position, or not having enough fabric in the back of the bodice to position the back scye correctly, et cetera. It should be noted, too, that sleeves and armscye shape and position change dramatically in different fashions and styles, so the fit of a sloper sleeve is primarily important because of what it indicates about the bodice fit rather than the sleeve itself. Pattern sleeves can be adjusted on a case by case basis in keeping with whatever style is desired, but if you can’t move your arms forward in your sloper, then you know there’s a bigger underlying fit issue that needs to be figured out for any garment to fit correctly.
The intricacies of fitting fill lots of great books. One I have found very helpful for my own fitting is Fantastic Fit for Every Body by Gale Grigg Hazen. It has a lot of discussion of forward shoulder and broad and rounded back issues that other fitting books barely address. Fitting for Every Figure by the editors of Threads Magazine is a great resource as well. I hope to include more specific tutorials on using a sloper to adjust patterns and specific fit issues as I release them, so more on this in the future.
RECORD YOUR ADJUSTMENTS
The main goal in working with a sloper is to come up with something that you can replicate in all your projects. As you work through adjustments for better fit, it’s important to keep notes of what works best for you. I mark up and experiment with the muslin, and then transfer my adjustments, dart placements, and corrected sewing lines onto the sloper. It can then be traced onto a more permanent material like the Swedish tracing paper, posterboard, or oak tag to make a master copy. You’ll want to keep one clean copy as a permanent record, and then manipulate traced off copies to align with the same lines and dart placements of patterns you’re modifying in the future. The thickness of posterboard or oak tag makes it especially easy to trace off copies to work with in the future.
